If this guide helps you consider staking with SKULL ![]() pool every little bit helps!~
pool every little bit helps!~
Overview
This guide is for X86 processors using Debian/Ubuntu based Linux operating systems.
Minimum requirements
4 Core
16 gig ram (If your block producer is running out of ram you will need a swapfile, you can also turn off tracemem pool in config.json https://linuxize.com/post/how-to-add-swap-space-on-ubuntu-20-04/)
200 gig SSD
Getting Started
Setting up your Linux server
If your server is at home you can connect to it directly using a keyboard & a monitor. All you need is a PC with the minimum requirements.
You're also going to need to learn how to install Ubuntu on a computer if you don't know how most service providers will do it automatically for you. Check out https://contabo.com/en/vps/vps-l-ssd/?image=ubuntu.267&qty=1&contract=1&storage-type=vps-l-800-gb-ssd
If you want to learn how to install Ubuntu yourself you will have to learn outside of this thread https://ubuntu.com/server/docs/installation
If its running on a cloud service you need to connect to it remotely. If you’re on Windows you can use a program like (PuTTy https://www.putty.org/) (this app should work on mac, windows and linux)

Type in your IP address/Hostname & port of your server.

Add the username you created in the “Auto-Login Username” field
If you're using Amazon AWS or another cloud provider that automatically set up your SSH key for you, you can add it in the "Private key file authentication" field.

Normally Amazon AWS will give you a PEM file, but for it to work in PuTTy you need a PPK file. To convert the PEM file into a PPK file download PuTTygen (https://www.puttygen.com/)

Click load & locate your PEM file and load it. Now you can add a passphrase to it and export your PUB KEY and Private key. **Make sure you don't lose this because you will lose access to your server.
Now if you don’t have a PEM key and you have a service provider like (Contabo) who will just give you a root login with a password.
Follow the steps below to create your own SSH key!
- SSH to your server using PuTTy
- PuTTy terminal will ask for your root/username password that you setup when you created your linux server.
- Type in your password.
If you logged in as root you’re going to need to make a new “username”
sudo adduser cardanonoob
![]()

Its going to ask you to enter a password, pick a password and press enter.

Next it will ask you to enter some information, you can just press enter on all fields to skip. (You can add information if you want)

Next you want to add that user to the list of users who can run “sudo” commands.
sudo usermod -aG sudo cardanonoob
![]()
Now navigate to your new users home folder
cd /home/cardanonoob/
![]()
Login to your new username.
su cardanonoob

Type the password you made earlier.
If you don’t have a .ssh folder created then follow the steps below.
Type
ls -al
This will show you hidden files and folder.

What we’re looking for is the “.ssh” folder. If you don’t have the folder type the command below.
sudo mkdir .ssh
![]()
Now grant the folder some permissions
sudo chmod 700 .ssh
![]()
First Method (Scroll to Second method for generating SSH if you want a quicker method.)
Type the following
sudo ssh-keygen
This creates a 2048 RSA key pair.

Its going to ask you for your password, type the password you created earlier for sudo (super user commands)
It will ask for which directory to save the file, type:
/home/cardanonoob/.ssh/id_rsa
Next it will ask for a password you can give it something or leave it blank.
Now navigate to your ".ssh" folder, you need to be in your /home/cardanonoob/ to check which location your in type "pwd".
pwd
cd .ssh
![]()
**If this command gives you an error like this
![]()
sudo su
This will make you root
chown cardanonoob .ssh
![]()
Now log back into your username “cardanonoob”
![]()
Now list the contents of the “.ssh” directory
ls
![]()
You will see your private & public ssh key you generated.
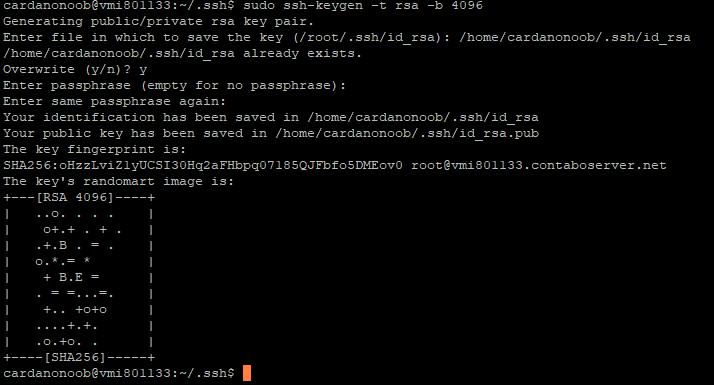
For extra security, use RSA4096
ssh-keygen -t rsa -b 4096
Now you want to create a file inside of “.ssh” called “authorized_keys”
echo public_key_string >> ~/.ssh/authorized_keys
Substitute “public _key_string” with whats inside of your “id_rsa.pub”
cat ~/.ssh/id_rsa.pub

Just copy all that you see here and change the command
echo ssh-rsa AAAAB3NzaC1yc2EAAAADAQABAAACAQCXKnFIuFhF >> ~/.ssh/authorized_keys

Now list the contents of the directory
ls
Type the following command
nano authorized_keys

You should see your “id_rsa.pub” key inside of your “authorized_keys” file
Once you have created the public ssh key you can copy that id_rsa.pub to PuTTygen.
To do this you need to connect to your server using a FTP client like Filezilla https://filezilla-project.org/
After you install “Filezilla”
- Click file > Site Manager > New Site

-
Add your server ip adddress in the hostname section , change FTP to SSH and add in your port.
-
Type in your username and password and connect to your server.
-
Once your connected to your server navigate to your .ssh folder.
-
Copy your id_rsa to a folder on your pc.

-
Click the load button and find your “id_rsa” file
-
If you created a password type it when prompted.
-
A prompt will pop up if it was successful, you can now save your keys.
![]()
To recap we generated a SSH key on our linux server. Downloaded to our pc and loaded into PuTTygen to create a file compatible with PuTTy, so that we can connect to our server in the future using SSH.
Second Method
Now you can do the reverse of this to make it a lot easier.
- Just open PuTTygen
- Select RSA and type in 4096 in the box

- Now click “Generate”
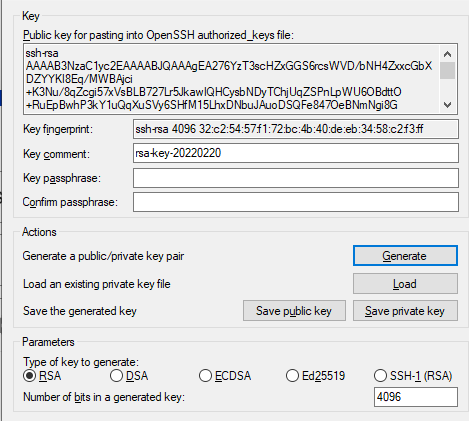
-
Type a password if you want and save the “public key” and “private key”
-
Copy everything in this field

-
Load up your PuTTy terminal and paste this key string into “authorized_keys”
You now know 2 methods for creating a SSH key for your server!
Finally, we’ll ensure that the /home/cardanonoob/.ssh directory and authorized_keys file have the appropriate permissions set
chmod -R go= /home/cardanonoob/.ssh
![]()
Next type the following
chown -R cardanonoob:cardanonoob /home/cardanonoob/.ssh
Type to check the owner of the .ssh folder and authorized_keys file
ls

Security Setup
First we want to setup the firewall.
Type
sudo ufw status
This should be off.

**If your server cloud provider has its own firewall like Amazon AWS don’t add your firewall rules using UFW, keep your UFW off or you will lock yourself out!
Login into your cloud provider and check if they have their own firewall/security rules!
sudo ufw allow proto tcp from any to any port 22
![]()
This allows you to connect to your server from anywhere on SSH port 22
Before disconnecting from the SSH (PuTTy connection) Open a new PuTTy connection to test that you can still login!
Once you have verified you can still connect to your server after adding a firewall rule add another firewall rule.
sudo ufw allow proto tcp from any to any port 6666 (or any port you want!)
![]()
What we’re doing here is adding a custom SSH port.
Now we need to modify the “sshd_config” file
sudo nano /etc/ssh/sshd_config
![]()

What you would do here is uncomment (delete the #) from the beginning of the port 22 and replace it with the 6666 to set a custom port! But don't do this now! We want to verify we can login through 22 first!
Scroll down pressing the down arrow inside the sshd_config file!
Uncomment (delete the #) in front of PermitRootLogin yes (and change to PermitRootLogin no)

Now to enable your .ssh/authorized_keys file you created earlier, uncomment the PubkeyAuthentication (remove the #) and write “yes” next to it.

Next step is to remove the # in front of AuthorizedKeysFile and type the correct path for your user name
/home/cardanonoob/.ssh/_authorized_keys
Press ctrl+o (this will save) press Y to overwrite the file. Now you can press ctrl+x Y to exit the file.
Now to make these changes go into effect type
sudo systemctl restart ssh
sudo systemctl status ssh

Now try connecting to your server using that PuTTy pubkey file you created earlier. It should have a .ppk extension.
You add it here:

It should bring you straight to the linux prompt (unless you added a password to your SSH key file) Type in the password you set earlier for your SSH key file.
Now if you were successful connecting to SSH using your SSH key file you can remove the login with passwords. (This will increase your security!)
sudo nano /etc/ssh/sshd_config
![]()
Scroll down and uncomment the line below and change to “no”.

Now you won’t be able to login with a password, so becareful you followed the steps correctly!
Run the commands below to apply the changes and check the status of ssh
sudo systemctl restart ssh
sudo systemctl status ssh
Now we want to upgrade/update the server
sudo apt update && sudo apt upgrade -y
![]()
It normally will prompt you for a Y or N check before updating & upgrading but we added the -y argument to the end. So if you want to manually check what is being installed remove this.
Another way to do this same command is
sudo apt-get update
sudo apt-get upgrade
sudo apt-get dist-upgrade
After it finish updating/upgrading you can reboot your server.
sudo reboot
![]()
Now navigate to your home folder
cd /home/cardanonoob
We will add one extra layer of security to the server by adding a service called “fail2ban”
sudo apt install fail2ban
Follow the prompts and check the status to see if it is running
sudo systemctl status fail2ban
**This is a lot more security steps you can take, but this is the bare minimum for now.
Next we will install a service called “Chrony” this will help keep your relay in time with other servers on the network, so there is less of a chance of missing blocks.
sudo apt-get install chrony -y
Create the chrony.conf file by copying and pasting the following code:
cat > $HOME/chrony.conf << EOF
 pool time.google.com       iburst minpoll 1 maxpoll 2 maxsources 3
 pool ntp.ubuntu.com        iburst minpoll 1 maxpoll 2 maxsources 3
 pool us.pool.ntp.org     iburst minpoll 1 maxpoll 2 maxsources 3

 # This directive specify the location of the file containing ID/key pairs for
 # NTP authentication.
 keyfile /etc/chrony/chrony.keys

 # This directive specify the file into which chronyd will store the rate
 # information.
 driftfile /var/lib/chrony/chrony.drift

 # Uncomment the following line to turn logging on.
 #log tracking measurements statistics

 # Log files location.
 logdir /var/log/chrony

 # Stop bad estimates upsetting machine clock.
 maxupdateskew 5.0

 # This directive enables kernel synchronisation (every 11 minutes) of the
 # real-time clock. Note that it can’t be used along with the 'rtcfile' directive.
 rtcsync

 # Step the system clock instead of slewing it if the adjustment is larger than
 # one second, but only in the first three clock updates.
 makestep 0.1 -1
 EOF
Move the file to /etc/chrony/chrony.conf
sudo mv $HOME/chrony.conf /etc/chrony/chrony.conf
Restart chrony in order for config change to take effect.
sudo systemctl restart chronyd.service
Preparing the Cardano Node
Finally we made it to where we can finally start building the Cardano Node! (once you do it a few times the steps above will become second nature allowing you to breeze through those steps much faster!)
Make sure your in your /home/username/ folder
To check type “pwd”
pwd
mkdir tmp

This will create a temporary folder called “tmp”
Change the directory your into tmp
cd tmp
Now download the prerequisites to building the Cardano Node
curl -sS -o prereqs.sh https://raw.githubusercontent.com/cardano-community/guild-operators/master/scripts/cnode-helper-scripts/prereqs.sh
Change the file permissions
chmod 755 prereqs.sh
Run the script by typing
./prereqs.sh
Next go to home folder cd /home/username/
. “${HOME}/.bashrc” (check the quotes if the command isnt working)
To check if the command $HOME was configured correctly type
cd $HOME
That should bring you to your /home/cardanonoob/ folder
Building the Cardano Node
Another way to back out of your “tmp” folder is by typing
cd …
This should bring you back to your home folder if you weren’t already there.
mkdir git (if this is made already you dont need to do it)
Change directory to git
cd git
Download the Cardano Node
git clone https://github.com/input-output-hk/cardano-node
Change directory to the Cardano Node folder.
cd cardano-node
Now fetch the tags to build the latest Cardano Node (these tags will change with each update.)
git fetch --tags --all
git checkout 1.34.0 (this depends on which version Cardano is currently at)
Run the following command
echo -e "package cardano-crypto-praos\n flags: -external-libsodium-vrf" > cabal.project.local $CNODE_HOME/scripts/cabal-build-all.sh -o
**If the command build all didn’t work go through the fetch steps and echo steps again!
If you’re getting GHCUP errors follow these steps:
curl --proto ‘=https’ --tlsv1.2 -sSf https://get-ghcup.haskell.org | sh
Answer NO to installing haskell-language-server (HLS).
Answer YES to automatically add the required PATH variable to “.bashrc”.
cd $HOME
source .bashrc
ghcup upgrade
cd /tmp
run ./prereqs.sh (you shouldn’t get any errors)
Then run again
echo -e "package cardano-crypto-praos\n flags: -external-libsodium-vrf" > cabal.project.local $CNODE_HOME/scripts/cabal-build-all.sh -o
Its going to take awhile to build the node, so go take a break and do something else and comeback in 20-30 mins to check on the status.
Try navigating to the Cardano Node folder /opt/cardano/cnode/scripts/
cd $CNODE_HOME/scripts/
If this shortcut command doesn’t work I recommend rebooting the server.
sudo reboot
Once the server is back on line try the command again
cd $CNODE_HOME/scripts/
If it still doesn’t work go there manually
cd /opt/cardano/cnode/scripts/
**Troubleshooting, if the folder is still not there, navigate to your /home/cardanonoob/ folder and try running the ./prereqs.sh script again but this time add the argument -f afterwards.
Once your in the /scripts folder run the following command
ls

Check the Cardano Node & Cardano CLI
The commands below will help you check if you built the correct version of the Cardano Node/Cli
cardano-node --version
cardano-cli --version

You can also check your “cabal” and “ghc” versions the same way
cabal --version

ghc --version
![]()
If everything looks good you can now start to prepare your node to sync to the network.
cd $CNODE_HOME/scripts
or
cd /opt/cardano/cnode/scripts
Open your “env” file so you can edit it with this command
nano env
Scroll down and uncomment the port line and change to 6000

Save the file by press ctrl+O and Y and enter
Exit by pressing ctrl+X and Y and enter
Deploy the Node
Now you want to deploy your Cardano node as a systemd service, so that if it crashes it will automatically reboot itself!
./deploy-as-systemd.sh
If this Cardano node is going to be your Block producer answer the following questions.
-
For Block Producer say NO for the topologyUpdater
-
For Relay say YES for the topologyUpdater, press enter for default timer.
Now restart the node
sudo systemctl restart cnode
Check the status of the node
sudo systemctl status cnode

You should be getting a green active (running) it shouldn’t be red.
It will take 1-2 days to sync to the network. To check the sync process type
./gLiveView.sh
Make sure your in your /scripts folder

At the top of gLiveView it will say Relay or Core depending which one is your Relay or Block Producer.

Once all your nodes are synced you will then need to connect them to each other!
Connecting the nodes
For setting up the Block producer navigate to your files folder
cd /opt/cardano/cnode/files/
or
cd $CNODE_HOME/files/

Modify the topology file
nano topology.json

*Image has been edited to hide some ip address values for security.
**Tip (to speed up your typing press the tab button)
For example type:
nano top tab button and it should complete the file name!
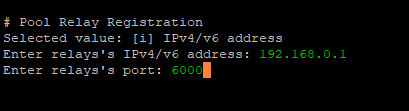
Inside the topology.json file just add your relay IP addresses!
{
  "Producers": [
    {
      "addr": "RELAY1 IP ADDRESS",
      "port": RELAY_PORT,
      "valency": 1
    },
      {
      "addr": "RELAY2 IP ADDRESS",
      "port": RELAY_PORT,
      "valency": 1
    }
  ]
}
Next update your Block producer firewall to allow your Relays to connect to them
sudo ufw allow proto tcp from RELAY_IP to any port 6000
Check to see if your relay IP and port was added
sudo ufw status
If you want to remove an entry from your UFW firewall
sudo ufw status numbered
sudo ufw delete 1-10 (which ever number it is)
*Becareful you don’t delete your access to your server!
When you make changes to the Block producer or the Relays you need to restart the node to reflect the changes.
sudo systemctl restart cnode
sudo systemctl status cnode
It will take awhile for your nodes to boot up, if they aren’t already synced you don’t need to worry about this part till they are because they won’t show them connected anyways.
Now on your Relays navigate to your scripts folder
cd $CNODE_HOME/scripts/
ls
nano topologyUpdater.sh
Where it says custom peers you can update this with your IP/Ports of your Block Producer & Relays
On your Relays you need to add the addresses inside of the /scripts/topologyUpdater.sh file! Block producer doesn’t need this!

CUSTOM_PEERS="1.1.1.1,6000|2.2.2.2,3001|3.3.3.3,1000"
*This is only an example, replace with your IPs and ports!
You don’t need to do this with your Block Producer, only the Relays!
Next we will update our cpu core count below.
One important thing you want to do after this is inside of your scripts folder is edit this file
Type
nano cnode.sh
![]()

Change the amount of cores your cpu has, if its quad core change it to 4, if it has 6/8 change it to that!
Now you want to add a rule in your UFW firewall to accept connections from all Relays!
*You don’t want to do this on your Block Producer only your Relays!
sudo ufw allow proto tcp from any to any port 6000
*Set the port to whatever you set in the ENV file!
Create wallet & register the pool with cntools
Navigate to
cd $CNODE_HOME/scripts/
Execute the script
./cntools.sh

Press enter on Wallet
You can createa New wallet or Import a wallet

Name your wallet
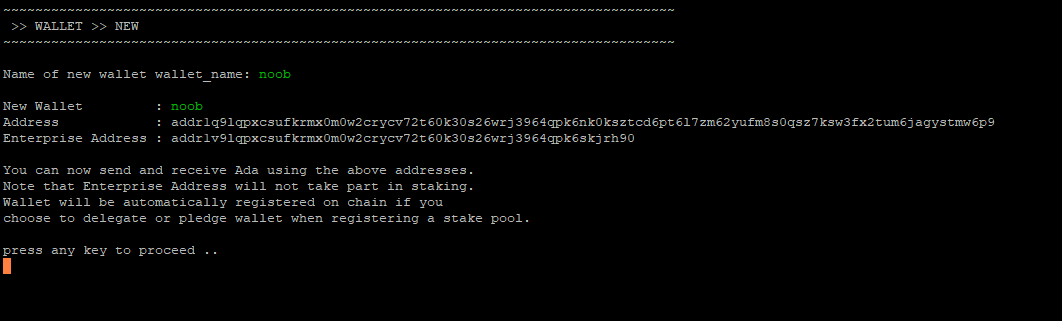
*Copy the address above, so that you can send ADA to it.
Send 500 ADA to the wallet address to pay for registering the pool.
You can also send some ADA for the PLEDGE, you can also keep the pledge at 0 till you learn more about it.
**You will get the 500 ADA back from the pool registration when you retire the pool. Make sure you don’t delete the wallet until you receive your funds back.
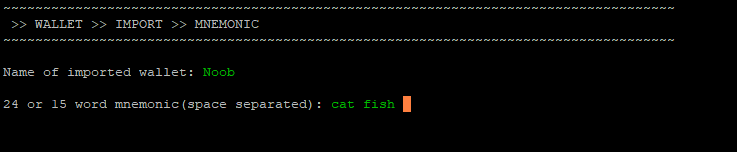
Importing a wallet using mnemonic
Go back into CNTOOLS
./cntools.sh

Press enter on wallet and select import and choose Mnemonic.
Edit the wallet name and enter your 24 word seed.
If you import a wallet it will reflect the funds you have in there, but you need to consolidate your wallet to the address that is displayed.
**Make sure you confirm that address that is displayed in CNTOOLS is the correct address for your imported wallet!
If you receive an error when trying to register or update the pool parameters make sure you follow the step above and send the ADA to your correctly displayed address inside CNTOOLS!
If you receive an error inside of CNTOOLS that says ERROR: need ‘bech32’ (command not found)
If no error skip this part
Which means you don’t have the cardano-address bech32 inside of the /home/cardanonoob/.cabal/bin/ folder.

sudo apt install bech32
If you still get the following error:
ERROR: cardano-address and/or bech32 executables not found in path!
Run prereqs.sh again to re-build the Cardano Node
Follow the steps below:
cd "$HOME/tmp"
curl -sS -o prereqs.sh https://raw.githubusercontent.com/cardano-community/guild-operators/master/scripts/cnode-helper-scripts/prereqs.sh
chmod 755 prereqs.sh
./prereqs.sh
. "${HOME}/.bashrc"
Check if “${HOME}/.bashrc” was configured
cd $HOME
nano “${HOME}/.bashrc”
Press X to exit N and enter
Delete the Cardano Node and redownload it and rebuild it again with the following steps:
cd /home/cardanonoob/git/
sudo rm -r cardano-node
git clone https://github.com/input-output-hk/cardano-node
cd cardano-node

git fetch --tags --all
git checkout 1.33.0

echo -e "package cardano-crypto-praos\n  flags: -external-libsodium-vrf" > cabal.project.local
$CNODE_HOME/scripts/cabal-build-all.sh -o
After node is rebuilt check to see if cardano-address & bech32 is present.
cd $HOME/.cabal/
ls -l
You should see the following

If you see the cardano-address & bech32 now then you build your node correctly.
Skip to here from the error troubleshooting above.
Create your Metadata.json file
{
"name": "🕱",
"description": "$SKULL token was created to act as a utility token within a closed self-sustaining ecosystem driven by the nemonium spirit of the Cardano community. This stakepool provides safe, secure and reliable staking for the delegators.",
"ticker": "SKULL",
"homepage": "https://nemo.global/",
"extended": "https://raw.githubusercontent.com/diicasses/pool/master/e.json"
}
Change the information to yours.
Now upload the file to a website you run or GitHub.
https://raw.githubusercontent.com/diicasses/pool/master/p.json
The length of the URL needs to be less than 64
**Your pool.json also needs to be less than 512 bytes! http://bytesizematters.com/
The extended link/file is so that you can add some customizations on services like https://adapools.org/ or https://cardanoscan.io/ when setting up your pool it will ask you for your extended pool.json and your pool.json.
Mine are named p.json & e.json to keep them as short as possible!
If you want to use GitHub you need to create your own repository for your pool!
*Make sure you set your branch as master
Create the pool
Navigate to your scripts folder and run the command
./cntools.sh
Press enter on Pool or the letter P

Press enter on New

Give the pool a name


**To proceed to the next step you will need 500 ADA in your wallet address!
Register The Pool
Click enter on Register or R

Select Online

Select the pool created earlier

Enter your pledge

You can leave this at 0, ideally you want to have your pledge in your wallet address for 2 epochs before updating your pools parameters with the new pledge. So if this is your first time I recommend setting it to 0 for now. **You can check which epoch we’re in by heading over to https://adapools.org/
Tip: 1 EPOCH = 5 days 73 epochs per year
Margin is your tax rate on your pool, if your just starting out set it to 0%

The default pool operator reward is 340 ada you can leave this default.
Now enter your pools metadata location


Now enter your pools relay IP

If you want to add more select YES

Now select your main wallet with your pledge and registration fee.

Make sure you have more than 500 ADA (updating pool is around .2 ada)

If everything was successful you will get a success message.
Start your Block Producer
After the pools been registered you need to modify the ENV file in your scripts folder.
cd $CNODE_HOME/scripts
Edit the ENV file
nano env
Activate the pool name by deleting the # in front of pool name

Save the file ctrl+O Y and press enter ctrl+X to exit
Restart the cnode
sudo systemctl restart cnode
./gLiveView.sh
You should now see your Relay saying Core

You should see information about KES & Block production
You need to rotate your KES key once every 90 days.
Securing your server files
It is not recommended to store your cold keys on your server. CNTOOLS provides a way to secure them if you do choose to store them on your server.
Make sure you back up your files off your server in a secure location!
Go into $CNODE_HOME/priv/pool/
cd $CNODE_HOME/priv/pool/pool_name/

Here you will see all your pool files
![]()
The files you just created are not secure.
Navigate back to your scripts folder and run cntools
./cntools.sh
Select pool and navigate to encryp pool

Type a password you won’t forget.
You wont be able to decrypt or make updates to your pool if you forget!
If you don’t have a hardware wallet setup then your going to want to encrypt your wallet files as well.

Make sure you have backups to your pool on a USB / cloud / email and password protect it/encrypt it! You lose your files and your pool is gone! And if anyone gets these files they can steal your pool or modify it!
If all steps went correctly you should now see your pool https://pooltool.io/ https://adapools.org/ https://cardanoscan.io/
Tips
- When Cardano releases a new node update it requires you to update / re-build the node. @Alexd1985 has created a script to make this easier.
https://forum.cardano.org/t/script-for-node-software-upgrade-cntools-users/91065
-
Rotating KES key just head on over to your /scripts folder & load up ./cntools.sh once its up just press enter on rotate. (make sure your pool keys are decrypted before rotating!) Quick & EZ!~
-
Cronjob automation & monitoring
Type the following
crontab -e
Press 1 when it ask you which one. (default)
Scroll down and paste this command for your relay (If you add this it could conflict with deploy-systemd scripts for the topology updater, at the moment I have it disabled.)
4 * * * * /opt/cardano/cnode/scripts/topologyUpdater.sh && curl -fsS --retry 5 -o /dev/null https://hc-ping.com/???????????
This will run topologyUpdater.sh every 4 hours.
After null you can add some monitoring with healthchecks.io add in your custom URL next to the command.

You can be notified by text, discord, or email if your Relay misses any checks!.
Its also possible to monitor the Block producer to make sure the tip doesn’t go out of alignment.
You’re going to need to make a new script in your /scripts folder.
nano pingTipCheck.sh
Paste the following below
#!/usr/bin/env bash
# shellcheck disable=SC2034,SC2086,SC2230,SC2009,SC2206,SC2062,SC2059
# Replace YOUR-USERNAME and YOUR-PING-ID below. You need a Healthcheck.io Account

CARDANO_CLI_PATH=/home/dii/.cabal/bin/cardano-cli                                       #Set the name which was used for Installing CNODE. - e.g. /home/YOUR-USERNAME/.cabal/bin/cardano-cli
                                                        #Make sure to replace YOUR-USER
HEALTHCHECKS_PING_URL=https://hc-ping.com/???????????           #Copy and Paste the full Ping URL from Healthcheks.IO - e.g. https://hc-ping.com/??????????????????????????
ACCEPTED_TIP_DIFF=60                                    #How many seconds are OK before starting to not send OK signals to Healthcheks?

######################################
# Do NOT modify code below           #
######################################

export CARDANO_NODE_SOCKET_PATH=/opt/cardano/cnode/sockets/node0.socket

customCurrentSlotNoString=$($CARDANO_CLI_PATH query tip --mainnet | grep -Po '\"slot\": \K[0-9]+')
customCurrentSlotNo=$(expr $customCurrentSlotNoString + 0)

customRefSlotNo=$(expr $(printf '%(%s)T\n' -1) - 1591566291)
customDiff=$(expr $customRefSlotNo - $customCurrentSlotNo)

if [[ $customDiff -le $ACCEPTED_TIP_DIFF ]]
then
  echo "all good sending ping"
  curl -m 10 --retry 5 $HEALTHCHECKS_PING_URL
exit
fi
Type
ls -al
To check the permissions of the pingTipCheck.sh file
![]()
To make the script executable
chmod 755 pingTipCheck.sh
Now you can make a cronjob
crontab -e
*/5 * * * * /opt/cardano/cnode/scripts/pingTipCheck.sh && curl -fsS --retry 5 -o /dev/null https://hc-ping.com/?????
Paste the code inside the crontab, it will run this script every 5 minutes to ping the tip of the Block producer to make sure it hasn't gone out of alignment. If it does go out of alignment HealthChecks.io will message you. Just updated the URL above & inside the script you created!
- If your PuTTy terminal keeps closing, you need to increase your keep alive packets!

Also when you’re working with multiple servers, which server your on can get confusing. This is why I change my cursor color for each server!

Troubleshooting
Questions/Answers will go here
Credits